
Jewellery CAD design is the process of building a precise 3D model of a piece so it can be reviewed, prototyped and manufactured. That’s it. Everything else is detail.
But you’re not here for a definition, are you? You’re here because you want to do something with that information. So here’s your next move, sorted by what you actually want:
- Commissioning a piece? Find a CAD design service that offers a fixed number of revision rounds and hands over production-ready files. Don’t skip this step.
- Learning the software yourself? Download a trial of Rhino or 3DESIGN and work through a single tutorial project this week, not “eventually”.
- Building a career or a serious hobby? Book a short course or a one-to-one masterclass rather than teaching yourself in isolation. It’s faster, and your mistakes get caught before they’re baked into a design.
Blackwell Jewellers uses CAD-backed workflows for bespoke commissions, which gives you a sense of what “good practice” looks like when you’re comparing studios.
Key Takeaways
Jewellery CAD design succeeds when studios pair capped revision rounds and production-ready STL files with genuine bench craftsmanship, not just polished renders.
| Point | Details |
|---|---|
| Match software to intent | Try Rhino for freeform sculpting, 3DESIGN or Matrix for parametric retail work, and 3ds Max for client-facing renders. |
| Confirm deliverables upfront | Ask whether STL files, prototype prints, and casting are included before agreeing a price. |
| Cap revision rounds | Expect one to three CAD rounds as standard, and give measurable feedback rather than vague impressions. |
| Trust the 3D file over the render | Rotate the model to check proportion and comfort; renders can flatter finish and colour. |
| Choose a studio on process, not polish | Blackwell Jewellers structures commissions around milestone approvals, hallmarking, and provenance checks at every stage. |
Where to check the software specifics yourself
- RhinoArtisan for jewellery-specific Rhino plugins and workflow automation.
- 3DESIGN for parametric modelling tools aimed at retail and repeat production.
- Autodesk’s jewellery design overview for Fusion’s CAD/CAM tools and 3ds Max rendering.
Vendor pages are worth visiting for exact feature lists, system requirements, and trial downloads.
Table of Contents
- What is jewellery CAD design software and which package should you try?
- What does a jewellery CAD design service actually deliver?
- Where can you learn jewellery CAD design properly?
- How does a CAD design go from brief to finished ring?
- How do you choose the right jewellery CAD designer or studio?
- What Blackwell Jewellers tells clients during CAD review
- What most guides get wrong about jewellery CAD
- Ready to commission a bespoke piece? Here’s how Blackwell works
- Sources
What is jewellery CAD design software and which package should you try?
Rhino is the industry’s most flexible tool, favoured by designers who want freeform, sculptural control over every curve. It has a steep learning curve, but the payoff is unmatched creative range, and plugins like RhinoArtisan claim to cut certain modelling and reporting tasks by 15 to 20 times through jewellery-specific automation and a purpose-built tool library.
3DESIGN and Matrix (branded MatrixGold) work differently. Both lean on parametric engines, meaning you adjust a ring size or band width by changing a parameter, not by redrawing the model. That’s why retail teams producing repeatable collections favour them: resizing fifty rings for stock is a different job to sculpting one bespoke piece.
Autodesk splits the difference across two products. Fusion handles CAD/CAM workflows for anyone thinking ahead to manufacture, while 3ds Max is built for photorealistic rendering and cloud collaboration, useful when a client needs to see a piece before it exists.
So, where do you start?
- Hobbyist or first-timer: Rhino’s free trial, or a beginner-friendly Rhino tutorial series.
- Retail or repeat-collection work: 3DESIGN or Matrix, for the parametric speed.
- Render-heavy client presentations: 3ds Max.
What does a jewellery CAD design service actually deliver?
Before you sign anything, know what “deliverables” should mean in a quote. A proper CAD service typically provides:
- Renders for visual sign-off, though treat these with a pinch of salt. Photorealistic renders can flatter a metal finish or stone colour more than the finished piece will justify. A rotating 3D file tells you more about proportion and wearability than a glossy still image ever will.
- Production-ready files, usually STL or 3MF, checked for tolerance issues before they go anywhere near a printer.
- A limited number of revision rounds, typically one to three, agreed before work starts.
- A prototype print for physical approval, ideally before casting begins.
When you’re comparing quotes, ask three unglamorous but essential questions: who supplies the prototype print and does it cost extra, is casting and finishing included or billed separately, and do you own the final CAD file once you’ve paid.
Pricing tends to follow one of three shapes: a fixed design fee, an hourly rate (riskier if the brief is vague), or a bundled design-and-manufacture package. Bundles often hide the design cost inside the total, so ask for it itemised if you want to compare studios properly. Blackwell Jewellers’ bespoke design cost breakdown is a useful reference point for what fair pricing looks like in practice.
Where can you learn jewellery CAD design properly?
Training routes split roughly into four types, and they suit different people:
- Short workshops (a day or a weekend) teach one software’s basics fast. Good for testing whether CAD suits you at all.
- One-to-one mentoring gives direct feedback on your own project, usually the quickest way to build a genuine portfolio piece.
- Longer structured courses (several weeks) build a fuller skillset, often across Rhino or 3DESIGN, with graded assignments.
- Pre-recorded tutorials are the cheapest and most flexible, but there’s no one checking your seat depths or wall thicknesses.
Whichever route you pick, judge it by outcomes, not marketing copy. Ask whether the course is project-based (you finish with an actual model, not just notes), what software it centres on, and whether feedback comes from small-cohort review or genuine one-to-one time with a working designer.
How does a CAD design go from brief to finished ring?
The pipeline is fairly consistent across studios, whether you’re commissioning through an atelier or a retail jeweller:
- Brief – you describe what you want, ideally with references and a rough budget.
- CAD model – the designer builds the 3D file based on your brief.
- Renders and review – you see the piece digitally and give feedback.
- Revision rounds – typically capped at one to three; experienced studios hold this limit firmly because open-ended revisions blow both timelines and budgets.
- Prototype print – a physical resin or wax version for final approval.
- Casting – the approved model becomes metal, usually via lost-wax casting.
- Setting and finishing – stones are set, the piece is polished and hallmarked.
A straightforward ring might move through this pipeline in a few weeks, but complex galleries, unusual stone shapes, or sourcing a specific ethical diamond can stretch things considerably. The approval stage after the prototype print is the moment that matters most: changes requested after casting mean starting large parts of the process again, at real cost.
Pro Tip: Give feedback in numbers, not adjectives. “Reduce the band width by 0.3mm” gets acted on. “Make it feel a bit more delicate” gets guessed at, and guesses are expensive once the piece is cast.
How do you choose the right jewellery CAD designer or studio?
Ask these questions in your first enquiry, before you’ve paid anything:
- Which file formats will you receive, and is STL delivery guaranteed as standard?
- What is the studio’s prototype policy? Do you get a physical print to approve, or only a digital render?
- How many revision rounds are included, and what happens if you need more?
- What’s the realistic lead time, including casting and setting?
Watch for red flags. A studio that won’t confirm you’ll receive production-ready files, that’s vague about revision limits, or that has no finished-piece photos or prototype examples to show you, is a studio to walk away from. Blackwell Jewellers’ guide to working with a jewellery designer covers the fuller question list worth taking into any consultation.
If speed matters more than complexity, prioritise a studio with fast turnaround on simple bands. If the piece involves intricate stone-setting, prioritise proven setting expertise over a quick timeline. Rushing a pave setting is how you end up with a loose stone six months later.
What Blackwell Jewellers tells clients during CAD review
Blackwell Jewellers builds bespoke commissions around milestone-based approval: brief, CAD model, prototype, then final piece, each hallmarked and provenance-checked before it leaves the workshop.
Clients who give specific, measurable feedback at the CAD stage get better results and fewer rounds than clients who describe a “feeling”. Prioritise safety and wearability, a comfortable band profile, secure prong thickness, correct seat depth for the stone, over how glossy the render looks. A photorealistic image can hide a proportion problem that a rotating 3D file reveals in seconds.
Expect one to three CAD rounds as standard practice, not an open-ended back-and-forth. It keeps projects on schedule and keeps costs predictable for everyone involved.
What most guides get wrong about jewellery CAD
Most articles on this topic treat CAD software choice as the whole decision. It isn’t. The tool matters less than the discipline around how it’s used: how many revision rounds you’re promised, whether production files actually get handed over, whether someone checks wall thickness and seat depth before anything gets printed.
Here’s what the evidence actually supports: CAD accelerates iteration and removes guesswork from proportions, but it doesn’t replace bench skill. A beautiful render from a designer who’s never set a stone by hand is a warning sign, not a selling point. The best outcomes come from CAD paired with people who understand how metal behaves under a burr and how a claw actually grips a diamond.
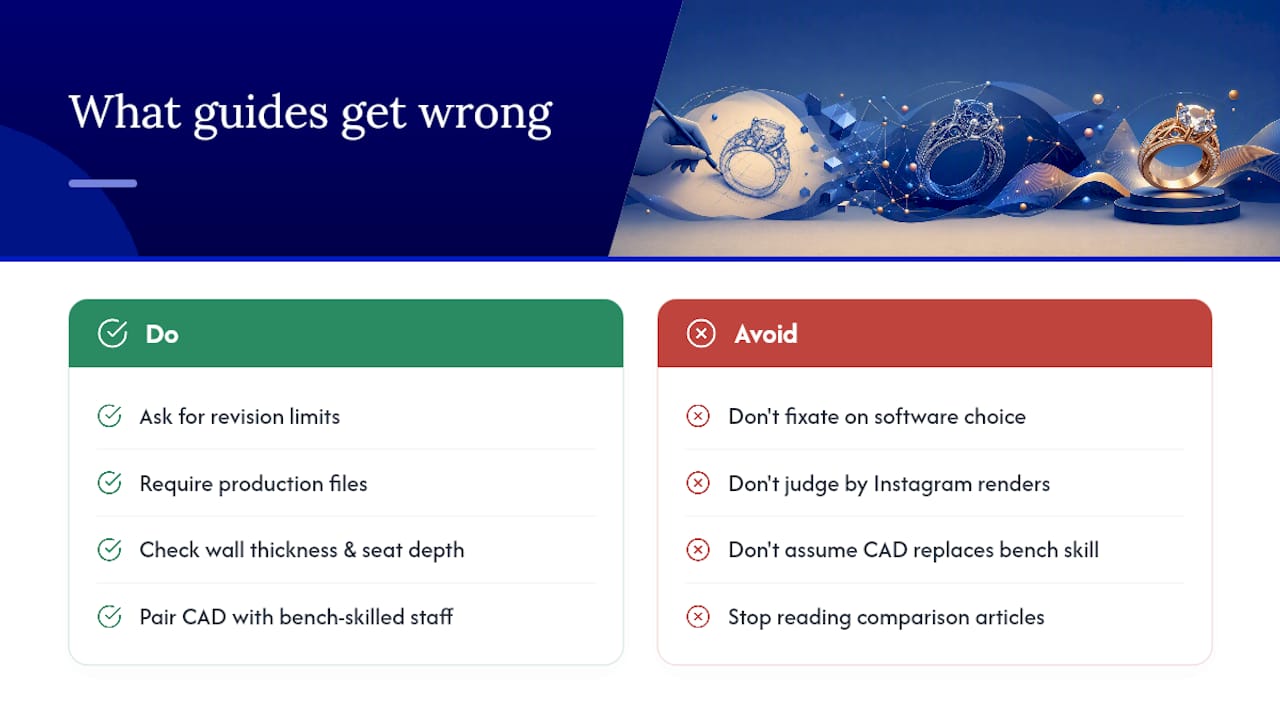
If you’re learning, don’t get precious about which software is “best”. Rhino, 3DESIGN and Matrix all produce excellent work in the right hands. Pick one, finish a real project, and stop reading comparison articles.
If you’re commissioning, prioritise the boring administrative questions, revision limits, file formats, prototype policy, over how slick the studio’s Instagram renders look. That’s where commissions actually go wrong.
— James
Ready to commission a bespoke piece? Here’s how Blackwell works
If you’ve read this far weighing up software trials against actually getting a piece made, there’s a shorter route: let Blackwell Jewellers run the CAD process for you.

A Blackwell commission starts with a proper consultation, moves through CAD-backed design review with a firm, agreed number of revision rounds, and finishes with a prototype approval before anything touches metal. You’re not left guessing what “a few tweaks” will cost, because the rounds and the milestones are set upfront. The same craftsmanship standard applies to Blackwell’s jewellery repair and restoration work, so if you’re restoring rather than commissioning from scratch, CAD-backed precision still applies to how a damaged setting or resized band gets rebuilt. Every finished piece, whether new or repaired, gets hallmarked and checked before it’s returned to you.
Read more on how bespoke jewellery design works at Blackwell, or get in touch to start a consultation on your own piece.
Sources
- Jewelry CAD & AI Design Software for Rhino | RhinoArtisan
- Autodesk jewellery design software overview
- 3DESIGN: 3D jewelry CAD software
- Understanding the jewelry-making process with jewelry CAD design
Recommended
- From Sketch to Reality: The Bespoke Jewellery Design Journey – blackwellonline
- Designing Your Dream: How to Start Creating Your Own Bespoke Jewellery – blackwellonline
- How to Work With a Jewellery Designer: Questions to Ask – blackwellonline
- Jewellers’ role in bespoke design and ethical sourcing – blackwellonline